|
Waxing and Polishing
Having a black colored truck has never help with keeping it look it's best. Since I purchased my 4Runner new back in June
of 99, I've religiously (weekly) washed and waxed it (Every 3 months or so) by hand.
I've been using McGuiars Gold Class
brand on the 4Runner since day one. Their product line is decently priced and has performed ok.
The biggest complaint
I have is that it doesn't seem to last as long. After a few car washes the water doesn't seem to bead. This typically indicates
that the coat of wax is no longer working. Secondly, I could never completely get rid of the paint goo (small contamination
particles that bond to the paint).
Recently, I was recommended Griots Car Care Products and a Porter Cable random
orbit buffer for applying waxes and polishes.
I decided to give their product a shot and placed an order for the following
products:
Part# Description
11153 Clay Bar
10631 Machine Clay bar holder
11145 Speed shine and
Sprayer
10626 Orange pad (for applying the polish)
10628 Red pad (for applying the wax)
11163 Machine polish
#3 (mildest)
11171 Best of Show Wax.
14600 Ten Pack of 100% Cotton polishing cloths
10625 Porter Cable Random
Orbit Polisher (Can be order from a different source for much cheaper.)
The following pics are the result of using
Griots Car Care products and the Porter Cable random orbit buffer.
I think the pics speak for themselves... What do you
think?
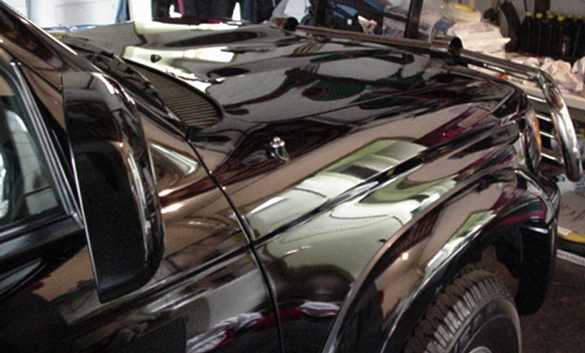
Is this clean or what?? :)
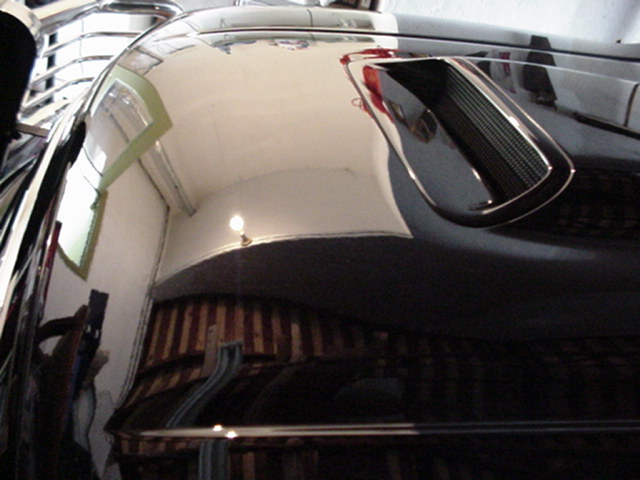

No... this is not a pic of my garage door!! This is the reflection of my garage door!!
Ok so pick up
your jaw off the floor and I'll tell you a bit on how I managed to get this shine. No big secret...
1) Wash
your 4Runner (oh you might not have 4Runner:)
2) Completely dry your vehicle. (I used the "Absorber that
Kragen carries in a tube.
3) Next come cleaning your paint. This is accomplished by using the clay bar and
the speed shine. Place the clay bar or half of the claybar into the clay holder and mush it down so it forms to the holder.
You want to make sure it's totally secured otherwise it will fly out :(
4) Spray some speed shine on a 2 to 3
square foot area of the vehicle and some on the claybar holder. The job of the speed shine is to lubricate between the claybar
and the paint.
5) Place the buffer on the paint and start it up on a slow to medium speed. Work your way across
the sprayed area and then back up.
6) once the 2 to 3 square foot area is completed then stop the buffer while
it spins on the paint.
*TIP* Always start and stop the buffer on the paint.
7) Take a 100% cotton rag and
dry up the excess speed shine.
Once this process is complete, you should end up with a glass smooth surface.
Rub your hands on a treated area and compare it to a non treated section. I bet you'll be happy with the results so far.
A second treatment may be applied without any fear damaging the clear coat. Remember all this is doing is removing
the contamination from the paint and prepping it for the polish and wax
8)Apply a small amount of Griots Machine
Polish #3 to the Orange pad and do a one section of the truck/car with the Porter Cable random orbit polisher.
9)
Use the polisher's own weight and guide it across and then back. Once a section/panel is complete, let the polish sit a bit
but not too long. You want to remove it before it dries completely, otherwise it will be a pain to remove.
10)Remove
the polish using one of the 100% cotton rags. Repeat step (9) to complete the rest of the truck.
11)Next comes applying
Best of Show wax. The same process is used as applying the polish, however you want to switch over to the red pad and you
want to use a different rag for removing the wax.
*TIP* Always use separate cloths to remove the polish and wax.
Secondly, when washing the rags you want to use a liquid base detergent, as it wont leave any residue behind.
12)A
second coat may be safely applied, however with a newer paint, I found that one coat did the job.
Thats it, not much
too it. As mentioned earlier it is an all day project but the results do make up for it.
*TIP* Ive been using Speed
shine to clean up the water spots or runs that are left the day after washing the Runner. Just spray the some on the stains/runs
and rub lightly with a clean 100% cotton rag and the spots disappear!!
Griots Car Care Products
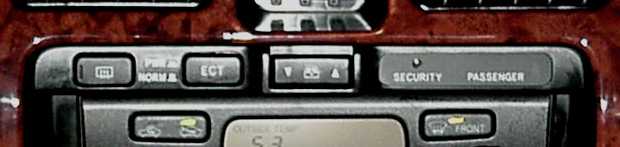
Auto CLimate Control light bulb location/replacement
The auto climate control in the 99-01 Toyota 4Runner Limited has (4) replacable bulbs. (2) light up the LCD display and the
other (2) light up the following buttons: Auto, Out/T, Mode, *Off, A/C & the outer rotorary controls.
81850-35020
LCD Display Bulb
81850-35030 Background bulb for the rotary/function buttons
In addition to the above (4)
bulbs there are (5) LEDs (not user serviceble) that light up each button when they are activated. The LEDs that are directly
soldered to the PCB assembly and not meant to be replaced by end user.
To replace any of the bulbs listed
above, you will need to remove the entire climate control out of the dash and dissamble it in order to replace the bulbs.
(Dont panic, its not that bad as it sounds!!).
Accessing the dash
In order to access the dash you
will need to remove the cup holder plastic assembly piece, the gear trim panel and the dash trim.
1. Start by
opening the center console door. The cup holder is then removed by gently pulling it up.
2. Next the gear trim
panel is removed in the same fashion. If your model is a 4WD model then pay attention the plastic around the 4WD lever.
This snaps out from trim by lightly tugging on it.
3. Finally, the dash piece is removed by gently pulling on it.
There a (5) clips that hold the trim to the dash. I found that starting from the bottom and working your way up does the
trick.
4. Once the dash piece is out, you will need to disconnect all of the connectors. All of these are quick
disconnect, so just press on a tab and they are released. Remember to double check that they are all back in when the dash
piece before placing it back.
Removing the Climate Control
1. Prior to removing it determine which
bulb is bad by turning the ignition on and noticing which area is dim.
2. There are (3) screws that secure the
climate control to the dash. (2) on the passenger side and (1) the drivers side. Remove all (3) with a phillips screwdriver.
3. The climate control should just come out at this point. Next disconnect the (2) electrical connectors (quick
disconnect) behind the climate control.
4. Remove the (2) phillip screws (located behind the black control/trim)
that secure the entire LCD/Black trim to the actual control box.
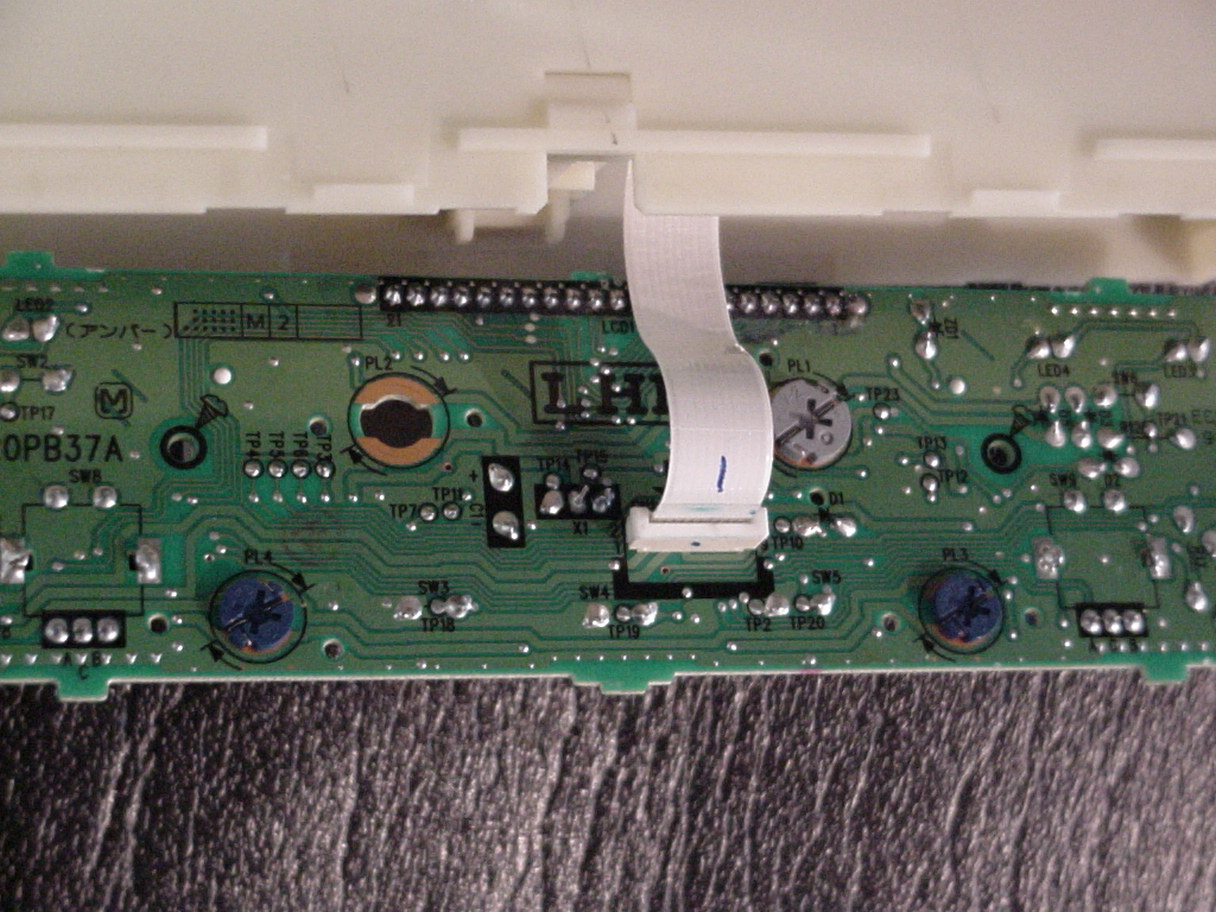
5. This should give you access the front of
the PCB (Printed Circuit Board).
6. The replaceable bulbs are identified as PL1, PL2, PL3 and PL4. PL1 and
PL2 are the larger ones (display bulbs). PL2 and PL3 smaller bulbs (light up the remaining of the buttons).
7.
The bulbs are removed by turning them clockwise with your hand or a small flatblade screwdriver.
8. Insert the
new bulb, re-connenct the (2) quick disconnects from step 3 and turn the ignition ON to test.
9. Put everything
back together by Reversing the process and you're done!!
Panel Sub-Assy Part Number 84013-35040
During the install of my Clifford Intelliguard 9000 alarm, I requested to the installer to use the stock security LED. The
stock LED is mounted on a small PCB assy behind this panel and its covered up by a clear plastic insert. the idea of doing
this was to minimize any modification to my panel.
Once the intall was complete, I was not too happy with the brightness
of the LED. (Not that it was ever bright from the start)and I was having trouble seeing it during the day.
My solution
was to install a high intensity LED as a replacement for the stock LED. I proceeded and drilled a small hole on the above
panel assembly so that I could do away with clear cover that would reduce the brightness of the LED. This worked great but
perhaps to too good that it now lights up the entire car/garage at night.
My next step was to get a replacement sub
assembly panel and use this high intensity (Blue) LED behind the stock lens. I've just gotten the panel in and I will update
this as soon as I complete the job.
|